ADD AND CHANGE FONTS WITHOUT PLUGIN (UPDATED)

We often get asked about how to add or change fonts without using a plugin. In this post, we are going to show you how to do it using Google web fonts.
WHAT IS WEB FONTS?
Web fonts are not preinstalled to a theme. It will be downloaded to your browsers while you are browsing the web page. The problem is it will slow down your website page speed which is kind of a big deal considering everyone now have access to a faster network and wouldn’t want to spend more than 10 seconds waiting for your website to response. So it’s best to just use 2-3 different web fonts on one single website.
CHOOSING THE WEB FONTS
Google Fonts is the most popular and is been widely used across different web building platforms since its release. It provides a whopping 818 font families including sans serif, serif, display, handwriting and monospace. All you need to do is choose your desired font, copy and paste the fonts code to your theme file.
1 ) The search bar – Enter the name of the fonts you want to use and see if Google font has it.
2 ) Categories – The fonts family is divided into 5 groups. Uncheck the category that you are not interested in to narrow down the fonts choices.
3 ) Languages – Some of the fonts may not support certain languages. Select the language that you use from this menu and see which fonts you could use.
4 ) Text area – Type anything in this area to preview the fonts.
5 ) Once you find your perfect font, click that “plus” button to add that to your font library.

ADD THE WEB FONT TO YOUR BLOG
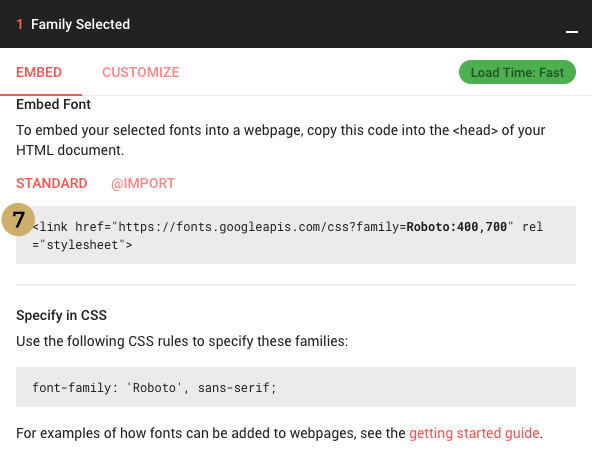
6 ) Once you added the fonts to your font library, it will pop out from the bottom of the page. You could use multiple fonts at the same time and you will see the load time of the fonts you choose, just make sure the load time is fast.
Click the “CUSTOMIZE” tab and select the font weight. If you are using the fonts for your blog posts body, make sure you have selected regular as well as bold. Otherwise, the “bold” option for the body text will not gonna work.

7 ) Click the “EMBED” tab, and copy the entire code from the gray box 1.

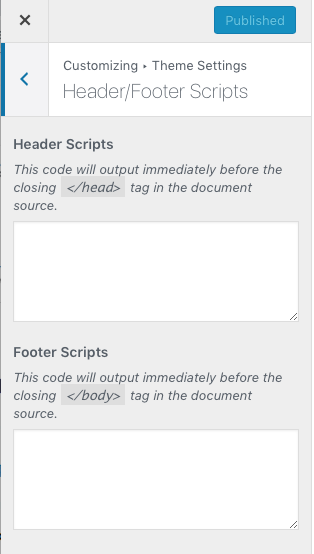
8 ) Go back to your WordPress blog dashboard > Genesis > Theme Settings > paste the code in the header scripts box > save the settings. The font is now ready to use.

HOW TO USE THE WEB FONT
1 ) Go to your WordPress blog dashboard > Customize > Additional CSS.
To use the web font for the body text. Paste the following code to the additional CSS box > replace the font-family with the new web font font-family. The new web font font-family can be found from the second gray box of your Google font library. You could also adjust the font size and font weight of the body text using the following code. Once you are happy with the changes, click the “Save & Publish” button.
The code should look like the following.
body {
font-family: ‘Lato’, sans-serif;
font-size: 15px;
font-weight: 400;
}
If you don’t see the changes after applied the new elements, you may need to clear your browser’s history and cookie, relaunch your browser and refresh the page.
Here are some of the common classes that you could use for changing fonts, font size and font weight.
For the post title
.entry-title {
font-family: Playfair Display, serif;
font-size: 25px;
letter-spacing: 1px;
}
For the navigation menu tab
.genesis-nav-menu a {
font-family: Playfair Display, serif;
font-size: 25px;
letter-spacing: 1px;
}
For the sidebar widget title
.sidebar .widget-title {
font-family: Playfair Display, serif;
font-size: 25px;
letter-spacing: 1px;
}
For the blog title
.title-area .site-title a {
font-family: Playfair Display, serif;
font-size: 25px;
letter-spacing: 1px;
}
 ADD READ MORE TAG (GUTENBERG)
 ADD E-COMMERCE TO YOUR WORDPRESS
 HOW TO IMPROVE WORDPRESS PAGE LOADING SPEED
 HOW TO ADD GOOGLE ADSENSE TO YOUR WORDPRESS BLOG